Tuesday, February 26, 2013

Craft a Week- Week 8


I broke the news of this week's craft kinda early on Facebook. While on my weekly trip to Hobby Lobby, I found premade pillow case shells for $4.99-$7.99. They were 50% off on top of that. I can't even buy fabric for that cheap! So I grabbed 3 different styles- 2 each. My granny (well I call her mine, she's really Bobbs' granny) had a whole box of stuffing left over from one of her projects, so I used that to fill the pillow cases.

They are super easy to fill and have zipper closures.

Even the puggies like them :)

They are a super cheap way to add a little pizazz to the living room.
 I'll probably add a few more later...

Keep on Crafting,
Paige

Craft a Week- Week 7

Hello friends! Sorry I haven't been posting on my blog the past couple of weeks; my life has been a crazy roller coaster. Fortunately my crafts have kept my mind busy. With that, let's dive into a new craft.

We have two small windows in our kitchen. One has an ugly window unit in it, and the other has metal mini-blinds. I must say I really hate metal blinds, they look so cheap. So I decided to revamp the windows with new window treatments. My sister is moving and asked if I wanted anything in her current house. She has these really beautiful lace window valances. Being that I am a sucker for anything lacey and vintage, I snatched them right up. They are the inspiration for the window treatments. I wanted to keep the panels simple so I just bought unbleached muslin. The light cream color of the muslin complimented the antique patina of the lace valances.

I measured my windows and doubled the fabric for each so the curtains would have a full effect. 

I ironed the fabric first. 

I hemmed the edges and created a pocket at top of the panel for the curtain rod to go through.

 I just got those metal, clip on rods so the panels would cover the window completely (so there isn't a gap of space on the edges).

I just love the look these give our kitchen. 
 (forgot to tie these back when I took the pic)

My husband had decorated the kitchen with a wine theme before I ever moved in. I must say I'm pretty proud, he did a good job. I'm trying incorporate a little french country into the wine theme. The airy panels and the lace are a perfect touch to the kitchen.


Keep on Crafting,
Paige

Tuesday, February 12, 2013

Craft a Week- Week 6

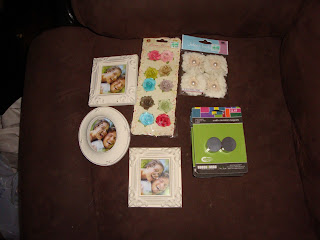
This week's craft inspiration didn't really come from Pinterest, more of a spur of the moment thought while I was in Hobby Lobby. The materials for the craft that I really wanted to make weren't on sale, so I walked around looking for craft inspiration (I refuse to pay full price for something that I know will be 1/ 2 off next week). I walked past the aisle with magnets and thought about the paint chip calendar I made on week 1. It looks super cute on my fridge, but the magnets and other junk on my fridge looks yucky. So I scooped up some magnets and scrapbook embellishments to make fancy magnets for the fridge. I also got mini photo frames to add pictures to the fridge (if you've been to my house, you know I like pictures!).


This project took maybe 5 minutes. I used e-6000 to glue the magnets to the back of the flowers and photo frames. I did rip off the easels on the back of the frames because they made the frame lay crooked. 

So here is the before and after:

Before...

After...


I couldn't get rid of the big magnets under the calendar- when someone closes the fridge door, the frame slides down. HaHa! I'll have to get more flowers and glue on top. Other than that, I like the way it looks. All the magnets before were hodge-podge and didn't match, which drove me crazy. And yes, I need to print off some pics that will fit into those small frames :)

Keep on crafting,
Paige

Sunday, February 3, 2013

Craft a Week- Week 5

Let me just say I love wreaths. Love them. I would probably make one for each month if I had the room to store them all. That being said, this week's craft is, you guessed it, a wreath. As I took the Christmas one down a couple weeks ago, that space looked so bare and sad. I don't like pulling into the driveway and seeing it so blank (that and the fact that all my plants are dead.
 I will have a green thumb one day). 

As I browsed wreath ideas, I knew I wanted a neural one that could be hung year round. I'm not much on burlap and twine, but I found myself liking this style the best. Plus I'm a sucker for monograms. 

Source

So getting a bare wreath, not a problem; they have tons at Hobby Lobby. Monogram letter, easy; aisle opposite scrapbook paper at Hobby Lobby. Now fabric flowers, that's where I get stumped. My friend, Emily, has a shop on Etsy called Ellarye Boutique. Her work is FABULOUS! She made all the bouquets, boutonnieres, and flowers for my wedding (sample here). She makes perfect fabric flowers. Luckily I found a nice tutorial with step-by-step pictures.

Source

This is how I started....


I started with the simplest thing first, the monogram letter. I wrapped twine over and over around the letter. Then I worked on the fabric rosettes. After the first few, they actually got fairly easy. I was surprised. I'll have to incorporate them in a future project.


After I made the rosettes, I glued them onto the wreath and added the monogram.
 
Ta Da! It's hung and looks perfect on the front porch.


Keep on Crafting,
Paige