Sunday, January 27, 2013

Craft a Week- Week 4

This week's craft inspiration came from my shopping trip. I had some gift cards from Christmas that I needed spend and the weather this week was beautiful. So I decided to get out and pick up a few new things for myself. My trip started at the Target end of Sherman Town Center with the last stop at Hobby Lobby. While at Old Navy, I found some pretty cute plain t-shirts and sweatshirts. My thoughts went to a couple pins I had pinned on Pinterest. 


Pattern Pocket
Fabric Over Sweatshirt

I started with the small project first- the patterned pocket. (FYI I am not an expert at sewing, I do what I can to get by). That being said, I started by making a template for the pocket.  NOTE: there weren't any instructions for these two projects, so I just kinda made it up as I went along.

 
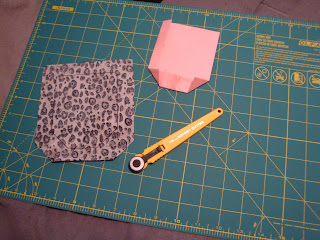
I made the template out of an old birthday envelope I had laying around. Traced it on the back on the fabric. Then I took my handy dandy "iron," my hair straightener, and ironed the edges down where I had traced it. Pinned it on my shirt. And sewed away. :)


And Ta- Da! The result is a plain t-shirt that has been transformed into super cute, trendy top. 


 _____________________________________________________________

 Now for project two. I was really an over-achiever for this one... The fabric I chose was adorable, but sheer and stretchy. Probably not my best choice for a beginner sewer, but I was optimistic. 


I took the fabric and used the seams on the sweatshirt as a template. I pinned around the edges and sewed each piece at a time; front, back, and both arms. 
 

And the final product...


I am excited with the end result! I can't wait to wear it :)

Keep on Crafting, 
Paige


Monday, January 21, 2013

Craft a Week- Week 3

This week's craft was a spur of the moment thought while I was at Wal Mart. I remembered reading about a necklace that a lady had made using beads she purchased at Wal Mart. I detoured from the groceries and went to the craft aisle. To my surprise, they actually had the same beads. So it was decided, I was going to make the turquoise knot necklace I had seen on Pinterest. 


On her blog, she says she threaded the beads on thread. When I compared her necklace versus "theirs," I figured her's turned out saggy because she didn't use something more sturdy like jewelry wire. I went ahead and bought wire because I liked the crispness of "theirs."


I used a baking sheet as a work station and to catch all the small beads I dropped. (Beading on a couch with two pugs is kind of impossible) I cut the wire into 8, 18in pieces. The source blog cut 16 pieces, but I ran out of wire and decided 8 pieces would be fine. I twisted 4 pieces around a jewelry ring, and made two of those- so 2 rings, 4 pieces each. Beaded each wire and left the ends bent over at the ends (they will connect to something later).


I took the two separate pieces and tied them in a Carrick Bend Knot (the source blog has a link with a video that shows how to make the knot). I tightened the knot, and twisted the two pieces after the knot together. Then I took the bent over ends and connected them to the ring.


 (Looks really pretty I know, but I figured it was in the back so it didn't matter)

Here's the finished product: Ta Da!


I really love this necklace! My husband said "are you really going to wear that?" (giving me an are you serious look) Heck yes I am! It's so cute! And even better, it was fairly easy to make. This was definitely a Pinterest win.


Keep on crafting, 
Paige

Sunday, January 13, 2013

Bored at Home

So as I browse Pinterest, I keep coming across these girls with beautiful, gorgeous locks. As I read further, they are posts about homemade hair masks. I used to skip over these, but I was bored at home and decided to give one a try. 
I had the ingredients for this one, so it was the lucky winner 
http://www.moneyaftergraduation.com/2012/08/02/honey-olive-oil-hair-mask/

Three tablespoons of olive oil and one tablespoon of honey. That's it. Since I have a huge mass of hair, I tripled the recipe. Nuked it in the microwave for 30 seconds and began to glop it into my hair. I did use gloves and stand over the sink (it got pretty messy). I then covered my hair with damp towels and let it set for one hour

 
I know, cute right?

Then I took a shower, washed and conditioned as usual. Let my hair towel dry for 20 min or so. Dried it and ran my flat iron over it a bit (if I don't, I look like a lion). 


I am rather pleased with the results. My hair is super soft and shiny. I will try and do this every week, or every other week.

Craft a Week- Week 2

This week I wanted to make a craft using things I had around the house. While browsing my Pinterest, I realized I had several pins on how to make t-shirt headbands. Since I am growing out my bangs, comfy headbands sounded like the perfect craft. I have two drawers of headbands, so I thought I could spare a few for my craft. 

These are the headbands from the source blog. 


 Her blog goes into great detail with step by step images. (It was very handy!)

Basically you cut two, 2in strips off the bottom of a t-shirt. And knot them as explained in her blog. After you try it one time, it takes less than 15 sec to make. I finished the ends a little different than her; I measured it to fit my head snugly, then I sewed the ends together.


I had so much fun making this headband, I had to make two :) 

I wanted to make another headband, but a different style.
 I came across this sweet lil blog- 

She also has a wonderful step by step guide, so I won't go into too much detail here. 
Here are the basics: 


Take five, 2in strips and sew them on top of each other (I used my sewing machine). I taped it to the table so it'd be easier to braid. You start with three pieces on the left, and two on the right. Then it gets kinda tricky. You braid the left side like a normal braid, then you take one piece and give it to the right side. I highly recommend reading the instructions on the source blog- she has it step by step with pictures.
 

I measured it to fit my head, sewed it together, and covered the end with fabric to cover my terrible hand sewing job. HAHA


And ta da it looks like this!


 I am very pleased with how the headbands turned out. 
I'm sure by this summer I will have one in every color :)


Friday, January 11, 2013

Craft a Week- Week 1

Pinterest is one of my weaknesses. Really. I can spend hours between the Hair & Beauty section, DIY & Crafts, and Women's Fashion. A thought occurred to me- I pin all these cute craft ideas, and never make them. Well I decided to commit to making crafts and DIY that I find on Pinterest. I will make one craft a week for an entire year, and share them with my friends. 

My first craft of the year is a paint swatch calendar. 


So I went to the Lowes paint section and gathered 7 different paint swatches (each swatch had 6 different colors on it). I chose more of a rainbow variation. I thank my art teacher, Mrs. Skupin, because I was saying ROYGBIV over and over while I found the colors I wanted. 
Then I went to Hobby Lobby and got a cheap 11x14 frame and magnets. 

I cut the paint swatches into 1 3/4 in by 1 3/4 in squares. The day pieces were a tad smaller,
1 3/4 in by 3/4 in. I had some plain paper for the background 12x12 sheets. I used two and pieced them together to fit the 11x14 frame (don't worry, the paint chips pretty much cover the seam). 


I glued the pieces in an ombre pattern, leaving the darkest piece for the top day piece. I didn't really measure and make the pieces perfectly line up- I just eyed it. After I finished gluing all the pieces, I put it in the frame and closed it up. I glued the magnets on the back of the frame with some permanent craft glue I already had. Ta Da, it's finished!

I used dry erase markers I already had, and filled in the calendar. It looks really great on the side of my refrigerator. Helps remind me of bills, special dates, etc.

I really enjoy making things and had fun with this one :)